5.6. Manual setting of slave devices
5.6. Manual setting of slave devices
There are 2 methods of setting slave devices connected to the network, which are automatic setting and manual setting. Manual setting will be explained first.

Figure 5.14 Insert Device toolbar button
(1) Click the Insert Device button shown in [Figure 5.14], and click the bottom part of the master on the network picture by cursor.
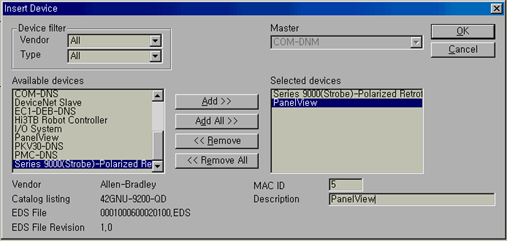
Figure 5.15 Insert Device dialog box (DeviceNet)
(2) A dialog box will be displayed, as shown in [Figure 5.15]. You can find slave names of registered EDS (or GSD) in the list on the left side. If you select a slave for setting and click the [Add >] button, it will be registered in the list on the right side.
(3) Select a slave device from the list on the right side, then input its MAC ID below and enter a description in the Description field.
(4) After registering all slave devices to the list on the right side, click [OK] to finish.
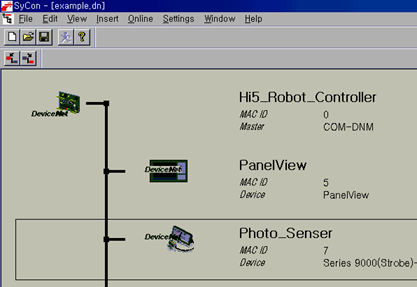
Figure 5.16 Registered slaves (DeviceNet)
(5) Now, the state of the network will be as shown in [Figure 5.16]. Parameter and I/O mapping setting should be done for each slave. When you double-click a slave to perform settings, a dialog box will be displayed as shown in [Figure 5.17].
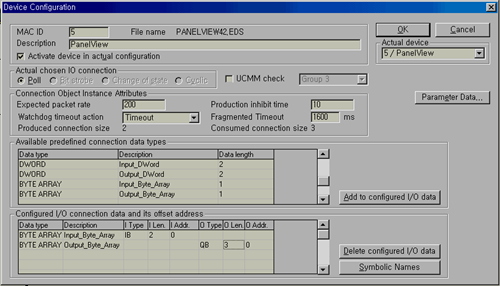
Figure 5.17 Device Configuration dialog box (DeviceNet)
(6) Execute the necessary parameter edit. The two list boxes at the bottom are for I/O mapping. For example, register the input and output of BYTE_ARRAY in the list box at the top of the screen by double-clicking each input and output of BYTE_ARRAY once, then select each value of I Len and O Len and enter 2 and 3, respectively.
Other parameter settings can be made through a very similar method.
The manner in which the master I/O mapping will be performed is also important. If the 『Settings – Auto Addressing』function is turned on by checking it, one-by-one mapping according to the registered sequence will be applied automatically. This application is realized when downloading all settings to the master module.
If the 『Auto Addressing』function is turned off, each “I Addr.” and “O Addr.” value of the list box on the bottom should be set appropriately.