7.2. Reference point recording
7.2. Reference point recording
Reference points are recorded in the following order:
l Use the Jog key, move to the position to record as the reference point
l Move the cursor to the position to record as the reference point (normally the step right above the WEAVON command)
l Click [User Key] → [REFP] (use hidden pose) or [Command input] → [Arc] → [REFP] to record the reference point (input pose variable)
(1) REFP 1: For setting when the wall direction is different from the z axis of the robot coordinates
Take one single point on a flat surface that will decide the wall direction, and set it as the reference point 1. As long as the single point exists on a flat surface that will decide the wall direction, where its position is does not matter. However, if the reference point 1 and the welding path are very close, the error that could occur when calculating the wall direction could get serious. Considering that, it is recommended to set the distance between the reference point 1 and the welding path not to be too close.
(2) REFP 2: For setting when the access point is the opposite side of the weaving work.
For setting to decide whether, based on the flat surface that will decide the wall direction, to create a weaving trajectory on the left or right side of if (a flat surface that includes the wall direction). Where the position of the reference point 2 is does not matter as long as it can be identified whether it is on the left or right side based on the flat surface that will decide the wall direction. However, if the distance to the flat surface in the wall direction is too short, the calculated error in the horizontal direction could get higher. Considering that, it is recommended to set the reference point 1 while placing it at an appropriate distance.
(3) REFP 3: For setting when the moving direction cannot be decided, like the case of weaving while in stoppage.
Where the position of the reference point 3 is does not matter as long as the reference point 3 is on a linear line that shows the moving direction. However, if the distance to the start point (end point) is too short, the error in the calculated result could get higher. Considering that, it is recommended to set the reference point 3 while placing it at an appropriate distance.
(4) REFP 4: For setting when it is difficult to measure the angle of the weaving pattern
REFP 4 can be used to set the angle of the weaving pattern directly.
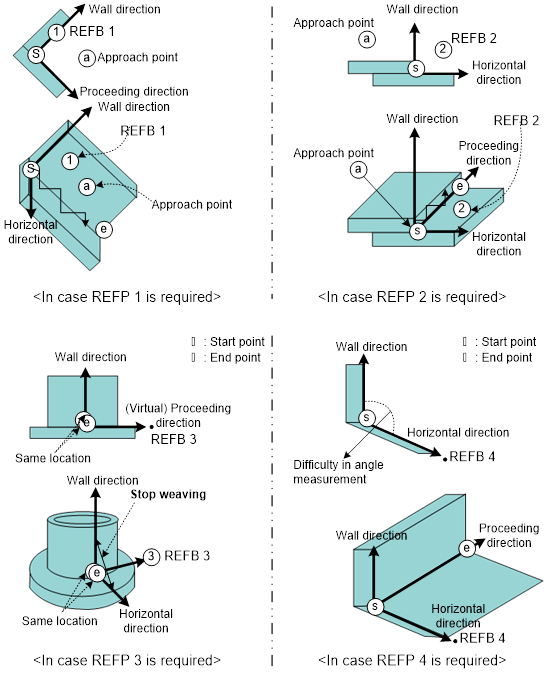
Figure 7.3 Application per each reference point type

l REFP 1: Set the distance to the welding path to at least 5mm.
l REFP 2: Set the distance to the wall direction to at least 5mm.
l REFP 3: Set the distance to the start point to at least 5mm.
l REFP 4: Designate an angle if it is difficult to measure the weaving pattern angle.