14.5. Welding auxiliary condition - retry, restart
14.5. Welding auxiliary condition - retry, restart
While the arc welding is set as digital, if the [F1: Aux. cnd] key on the welding start condition dialogue box is pressed, the welding auxiliary condition editing screen will be displayed as shown below.

Figure 14.6 Welding auxiliary condition dialog box (digital)
The retry function is to be performed when trying but keeping failing to turn on the arc. The restart function is to be performed when needed to restart the arc welding after stopping in the middle of welding being performed.
The item displayed on the left side of [Figure 14-6] shows the retry condition of the welding auxiliary conditions. The contents of individual items of the retry condition are as shown below.
(1) Count: [5] time (Range: 0 ~ 9)
Set the count of retries to be applied when failing to turn on the arc. If failing continuously within the set count, the robot will move back to the home position (The first arc ignition try point, welding start point) and stops there.
(2) Retry condition: [ 0] (Range: 0 ~ 32)
Enter the number of the welding condition to be applied when retrying to turn on the arc. Welding will be performed according to the main condition (Including current and voltage) of the welding start condition as entered for retrying. However, if the entered condition number is “0”and if the operation mode is reentry, the retried welding will be performed according to the main condition of the welding start condition that is being executed currently.
(3) Retry mode: <Reenter, Shift, Weld Path>
Set the method for moving the torch for the retry. 3 setting modes are supported, and individual methods for moving the torch are as shown below depending on their settings.
A. Reenter
Retry arc generation after moving back to the previous step in case arc generation is failed. Enter the moving distance to the distance during retracting/moving welding path during the retrial mode. Set the moving distance to ‘Reentr./Path Dist.’ distance in the Welding auxiliary condition retry setting menu. Follow the welding start condition for voltage and current condition since the robot will step forward again after stepping back a certain distance.
B. Shift
The robot will move set shift distance in retry condition of Welding auxiliary condition and return to the arc generation step. Arc generation will be retried in the welding start condition of condition number set in retry condition.
C. Weld Path
The robot will move the moving distance set in ‘Reentr./Path Dist.’ distance among retry condition of the Welding auxiliary condition along the welding path and retry arc generation based on the welding start condition of condition number set in retry condition. When the arc generation is succeeded, the robot will move to the welding start point and execute the welding work while arc is maintained.
(4) Moving Speed: [100]cm/min (Range : 1 ~ 999)
It is the speed of torch to move to the retry point or to return to the welding start point.
(5) RETRACT time: [ 0] sec (Range : 0.00 ~ 10.00)
It is the wire retracting time for retrying. Arc on will be done after retracting the wire, moving the torch and inching the wire.
(6) RETRACT speed : [ 10] % (Range : 0 ~ 100)
It is the wire retracting speed for retrying. This speed might not be applied depending on the welder. (Ex. Saprom welder)
(7) Reenter/Path Dist.: [ 3] mm (Range : 0.00 ~ 99.99)
It is the moving distance of torch for retrying in case the operating mode is set to reenter or welding path. Designate the operating mode setting in the start condition.
(8) Shift distance: X=[ 2], Y=[ 2], Z=[ 1] mm (Range : -99.9 ~ 99.9)
It is the moving distance of torch for retrying in case the operating mode is set to shift.
The item displayed on the right side of [Figure 14-6] shows the restart condition of the welding auxiliary condition. The contents of individual items of the restart condition are as shown below.
(9) Restart count: [5] time (Range : 0 ~ 9)
Designate the maximum number of times re-operating within same welding period. When this number is exceeded, “E1274 Number of times re-operating within same welding period exceeded” error will occur.
(10) Restart condition: [ 0] (Range : 0 ~ 32)
Enter the number of welding condition to be applied in the overlap range when restarting. When needed to restart welding by overlapping, welding will be performed in the overlapped range based on the main condition (Including current and voltage) of the welding start condition as entered for restarting. However, if the entered condition number is “0”, welding will be performed according to the main condition of the welding start conditions currently being executed in the overlapped range.
(11) Overlap: [ 5] mm (Range : 0.0 ~ 99.9)
It is the welding overlap distance (Overlap distance) for restarting welding. The robot will move back the overlap distance and start welding work again.
(12) Moving speed: [ 50] mm/second (Range: 1~999)
Set the speed at which the torch moves back to the overlap start point. It means the speed of moving in the range of ③ ~ ④ as shown in [Figure 14-7] (Refer to Figure 14-7).
(13) Welding speed: [ 50] cm/minute (Range: 1~999)
Set the speed at which the robot moves from the overlap start point to the end point while performing overlap. It means the speed of moving along the overlap length starting from ④ as shown in [Figure 14-7] (Refer to Figure 14-7).
When an error occurs while performing welding from the welding start point to the welding end point (⑤), if the overlap condition is semi-automatic, the user needs to identify what have caused welding to stop, and take care of the error. After the cause of the error is eliminated (②), if the user presses the [START] button (③) to restart welding, then, the robot will move to the overlap start point automatically at the speed set at [MOVING SPEED] (④). After moving to the overlap start point, the welder will move, while carrying out welding, along the overlap distance at the speed set at [WELDING SPEED] first and, after that, it will move at the normal speed while performing. However, if an error occurs while performing welding in the overlap area, the welder will restart welding at that point.
(14) Overlap condition setting
The bottom right of the [Figure 14-6] shows how to set the method for performing overlap if welding stops, in the middle of arc welding, due to some reasons, such as arc off, limit exceeded, gas off, wire off and coolant off.
A. Automatic
While the ‘Automatic’ function is set, if an error occurs in the middle of welding, the robot will move to the overlap start point automatically, without stopping, to perform welding while moving along the overlap distance. The function can be set only for the case in which welding stops due to arc off.
B. Semi-automatic
While the Semi-Automatic’ function is set, if an error occurs in the middle of welding, the robot will stop first. Then, the robot will perform welding while overlapping if the user restarts the welder.
C. Ignore
While the ‘Ignore’ function is set, if the robot stops welding in the middle of welding, the robot will move on without stopping.
D. Inhibit
If the ‘Inhibit’ function is set, the robot will be restarted without performing overlapping.
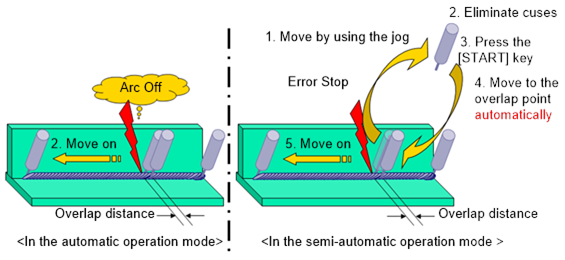
Figure 14.7 Restart operation sequence