1.3. Arc welding application condition setting
1.3. Arc welding application condition setting
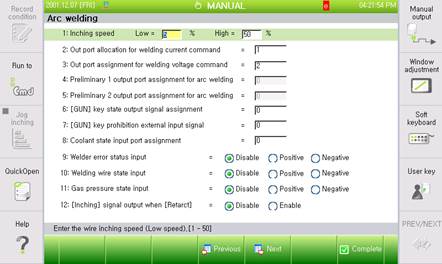
In manual mode screen, pressing 『[F2]: System』→『4:Application Parameter』→『2: Arc Welding』 will bring up a screen for setting various conditions for applying arc-welding as shown in the following screen.

Figure 1.8 Arc welding application condition dialog box
Details for each item are as follows.
(1) Inching speed: [1 ~ 25]
[1 ~ 50], [10 ~ 100]: The inching speed setting is about the wire feeding speed for wire inching and retracting when the [Feed] and [Retract] keys are used. The wire feeding speed is set by a current value. It is for setting the feeding speed for low speed and high speed (To be activated when pushing the key for longer than 3 seconds (Refer to Inching and Retract Functions)
(2) Out port assignment for welding current command: [1 ~ 32]
Sets the analog output port no. for generating the arc welding current reference voltage.
(3) Out port assignment for welding voltage command: [1 ~ 32]
Sets the analog output port no. for generating the arc welding voltage reference voltage.
(4) Preliminary 1 output port assignment for arc welding: [1 ~ 32]
Sets the analog output port no. for generating the reference voltage on the reserve arc welding output port No.1.
(5) Preliminary 2 output port assignment for arc welding: [1 ~ 32]
Sets the analog output port no. for generating the reference voltage on the reserve arc welding output port No.2.
(6) [GUN] key state output signal assignment: [Assignment of normal output signal]
For setting the output signal for producing the current state of the [GUN] key of the teaching pendant.
(7) [GUN] key prohibition external input signal: [Assignment of normal input signal]
For externally assigning the input signal for setting the on/off state of the [GUN] key. Once the relevant signal is assigned, the on/off state cannot be changed by pressing the [GUN] key of the teaching pendant. Using this function will prevent a user from pressing the [GUN] key by mistake and subsequently causing the welding process not to take place in a welding range (If the robot plays back while the LED of the [GUN] key is turned off, the ‘Dry Run’ situation, in which welding does not take place in the arc welding range, will occur). When the assigned signal is fed, the [GUN] key is turned off to allow ‘Dry Run’ to take place
(8) Coolant state input port assignment: [Assignment of normal input signal]
For setting a signal for receiving the information about the problem with the coolant circulation if a water-cooling type arc welding torch is to be used.
(9) Welder error status input: [Disable, Positive, Negative]
For setting the use of and a logic for a signal for receiving the information about errors with the welder.
(10) Welding wire state input: [Disable, Positive, Negative]
For setting the use of and a logic for a signal for receiving the information about the state of the welding wire.
(11) Gas pressure state input: [Disable, Positive, Negative]
For setting the use of and a logic for a signal for receiving the information about the state with the gas pressure.
(12) [Inching] signal output when [Retract]: [Disable, Enable]
For deciding whether to use a function that will produce the [Inching] signal together during the [Retract] operation. The function needs to be set be valid only when using a welder that requires the relevant function.
(13) Digital filter for Arc sensing: [0 ~ 200]
Sets the digital filter value to be applied in the arc sensing analog input value. Digital filter is not applied when entering 0 or 1.
(14) Input port assignment for Arc sensing: [-2 ~ 32]
This input port receives the welding current measurement value used in arc sensing. -1 and -2 are set when using arc sensing for welders that support CAN communication. -1 uses the welder input value and -1 uses the digital filter.
(15) Automatic saving when changing I and V: [Disable, Enable]
Determines whether to auto-save the value when changing the current and voltage in the 'Change arc welding current/voltage' box. Refer to "9: Changing current/voltage during welding" for further details.
(16) Automatic activation of monitoring during the welding: [Disable, Enable]
When the arc welding starts, the arc welding monitoring automatically sets the usage of the function displayed on the screen.
(17) High weight Arc torch filter is applied: [Disable, Enable]
For setting the application of a high weight arc torch filter. The high weight arc torch filter will help reduce vibration that could occur when using a high weight torch like a water-cooling type torch (However, the robot may operate at lower speed)
(18) Using Arc welding in manual mode: [Disable, Enable]
For setting whether to perform welding through forward steps. While the function is set to be valid and the execution unit is set to be ‘End’, if the welder moves to the arc welding range through forward steps, it will be possible to perform welding.