5.1.1. S-Axid Reduction Gear (HS210E)
5.1.1. S-Axid Reduction Gear (HS210E)
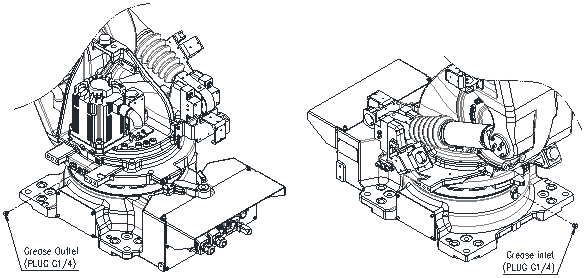
Figure 5.1 S Axis reducer grese inlet/outlet
| Attention
If grease is injected without removing the outlet plug, the internal pressure may increase, leading to grease leakage, and grease may enter and damage the motor. Be sure to remove the plug. |

n Grease Replenishment
(1) Prepare the grease nipple A-PT1/4.
(2) Remove the grease inlet plug G1/4 and fasten the grease nipple A-PT1/4.
(3) Remove the grease outlet plug G1/4 and air vent set, and then fasten the plug G1/4 to the air vent set (the air vent is only for the S axis).
(4) Inject the grease through the inlet by using the grease gun.
ü Grease type : VIGO GREASE RE0 ü Amount of grease : 3,367cc (3.0kg, for reference) |
(5) Inject the new grease until it comes out of the outlet.
The new grease can be identified by color.
(6) Remove the residual grease while moving the S axis for a few minutes, and then inject the new grease until it comes out of the outlet.
(7) Release the over-injected grease and residual pressure (refer to the following removal procedures)
(8) Remove the grease nipple of the inlet and the plug of the air vent part. Then, assemble the inlet plug and air vent set.
n Injecting the grease after replacing the reducer
(1) Prepare the nipple A-PT 1/4.
(2) Remove the grease inlet plug G1/4 and fasten the grease nipple A-PT1/4.
(3) Remove the grease outlet plug G1/4 and air vent set, and then fasten the plug G1/4 to the air vent set.
(4) Inject the grease through the inlet by using the grease gun.
ü Type of grease: VIGO GREASE RE0 ü Amount of grease: 4,200cc (3.8kg) |
(5) Inject the new grease until it comes out of the outlet.
(6) Release the over-injected grease and residual pressure (refer to the following removal procedures)
(7) Remove the grease nipple of the inlet and the plug of the air vent part. Then, assemble the inlet plug and the air vent set.
n Procedures for replacing the grease and injecting new grease and then removing the over-injected grease and residual pressure
(1) Attach a grease tray or hose to the grease outlet to prevent the surroundings from being contaminated by the discharged grease.
(2) Will operate under the following conditions within the range that does not cause interference with the surroundings.
① Operation angle: 90° or above
② Operation speed: 100%
③ Operation time: 20 minutes or above
(3) Wipe the outlet with a cloth and assemble the plug back into its original position.