2.3.1. Autosetting
2.3.1. Autosetting
Press 『[F1]: All autosetting』 to progress autosetting in the “basic setting” of the servo gun. The following conditions must be satisfied because the moving tip of the servo gun will automatically move in the “All autosetting” mode.
- Attachment of a new tip to the moving and fixed electrodes
- No presence of workers near the servo gun
- No workpiece between the moving and fixed tips
- Manual mode
- Motor on
- Prohibition of the maximum opening of the moving tip (certain clearance from the maximum opening locations)
In the “All autosetting” mode, the following procedures must be automatically performed.
(1) Encoder offset compensation
- Moving the moving tip to the maximum open location
- Executing encoder offset compensation after stopping at the maximum open location
(2) Axis origin setting
- Squeezing the servo gun three times and opening it two times
- Moving to the location where the two tips meet after squeezing three times
- User’s confirmation of the relevant location
- Executing the axis origin setting
(3) Soft limit setting
- Automatically performing the setting after axis origin setting
(4) Squeeze force – current table setting
- Automatically moving to the menu for the setting
In the autosetting of the servo gun basic setting, the “encoder offset compensation” location and “axis origin compensation” location are automatically recognized, allowing the “encoder offset compensation,” “axis origin compensation,” and “soft limit setting” to be progressed. In the autosetting of the basic setting, the “squeeze force – current table setting” does not automatically proceed. Please refer to the chapter for “Servo gun squeeze force – current table tuning” to proceed with the setting.
In the “all autosetting” mode, after movement to the axis origin location is performed, the user is required to confirm the location as shown below. At this time, check the location of the moving tip and return current (less than 1 A). If the tips are at a location where they touch each other slightly, press “Yes” to continue the setting. If the return current is high or the moving and fixed tips are not in contact with each other, use the jog key to fine-tune, and then press “Yes.” If you do not want autosetting, press “No” to end it.
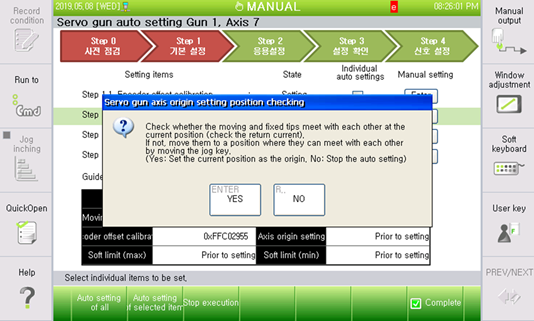
Figure2.5 User’s confirmation of the axis origin location
Caution) If there is a nonmetal stopper, such as a bumper hanging at the servo gun maximum open location, it will make it difficult to estimate the maximum open location. It is recommended to remove it before carrying out setting.
The configuration and functions of the servo gun basic setting screen are as follows.

1) Status: Presents the state of the servo gun (Not set, Completed, or Changed)
2) Individual autosetting: Supports the automatic setting of the checked items only, not all. If you press “[F2]: Autosetting of selected items,” only the checked items would be automatically progressed.
3) Manual setting: Moves to the screen to set each relevant item
- Encoder offset compensation
Automatically moves to the『[F2]: System』 → 『3: Robot parameter』 → 『4: Encoder offset』 screen.
- Axis origin setting
Automatically moves to the 『[F2]: System』 → 『3: Robot parameter』 → 『2: Axis origin』 screen.
- Soft limit setting
Automatically moves to the 『[F2]: System』 → 『3: Robot parameter』 → 『3: Soft limit』 screen.
- Squeeze force – current table setting
Automatically moves to the 『[F2]: System』 → 『4: Application parameter』 → 『1: Spot welding』 → 『7: Servo gun squeeze force tuning』 screen.
4) Guide: Indicates the present setting status or the cause of error and action plan
5) Monitoring: Displays the current setting status, servo gun location, return current and set values, etc.
6) All autosetting: Commands to execute all autosetting
7) Autosetting of selected items: Performs the autosetting of the items designated for individual autosetting
8) Execution on hold: Stops the setting in progress