2.1. Servo gun initial setting procedure
2.1. Servo gun initial setting procedure
This function is related to spot and other applications for which a servo gun is used. If you are using a different kind of gun (air gun) instead of the servo gun, refer to “Setting of tool number and gun type corresponding to the gun number” and “Tool angle/distance setting” in this chapter as well as “Relevant functions” in the next chapter.
The servo gun initial setting is a compulsory step to create a state in which spot welding can be performed using a servo gun. After completing the initial setting procedure, you can do the following.
- Operating the servo gun moving tip
- Squeezing with the designated squeeze force
- Inputting/outputting signals for spot welding
After completing the initial setting procedure, set the relevant functions and spot welding parameters (welding conditions, sequence, etc.), and carry out work teaching according to the purpose of use.
Through the “Servo gun autosetting function” (『[F2]: System』 → 『4: Application parameter』 → 『1: Spot welding』 → 『8: Servo gun autosetting』), the company provides the settings for spot welding, servo gun operation environment, and relevant procedures.

Figure2.1 Screen for entering the “Servo gun autosetting” menu
Caution: This menu can be entered only when the currently selected gun number is for a servo gun (“Additional axis parameter setting,” “Load estimation,” “Tool data input,” and “Tool number and gun type corresponding to the gun number” are compulsory items that must be set before the servo gun autosetting process.)
If you will use multiple guns, proceed with individual settings while changing the gun number.
The initial setting for the servo gun and spot welding is divided into five steps as follows. The progress status of each step will be indicated for monitoring.
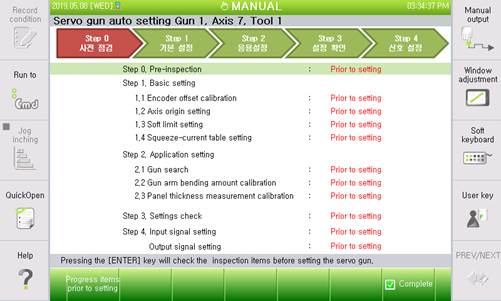
Figure2.2 Standard procedure for servo gun initial setting
The standard procedure for servo gun initial setting is as follows.
(1) Precheck: Check the compulsory preset items to set the servo gun operation environment.
- Additional axis parameter
- Setting of the tool number corresponding to the gun number
- Tool data (including load estimation) setting
- Servo gun parameter setting
(2) Basic setting: Setting of the servo gun operation environment
- Encoder offset compensation
- Axis origin setting
- Soft limit setting
- Squeeze force – current table setting
(3) Application setting: Setting for the application functions that use the servo gun
- Gun search
- Gun arm bending compensation
- Panel thickness measurement compensation
(4) Confirmation of the setting: Process to confirm the present setting
Input/Output signal setting: Assignment of input and output signals for spot application
The screen for the servo gun initial setting standard procedure not only shows the indication process and completion status but also makes it possible to progress related items or move to a screen that can progress related items.
In other words, the initial setting related to the servo gun can all be completed in the screen above without moving to related menus. There are two ways to progress in the initial setting.
(1) Move to the relevant procedure using the cursor, and press『[Enter]』.
(2) Press 『[F1]: Progressing the items not set』 to allow the initial setting to be automatically progressed.
The『[F1]: Progressing the items not set』 key will enable you to check all procedures to find any procedure that has not been progressed and then allow it to be automatically progressed. When it comes to the initial setting, after pressing the 『[F1]: Progressing the items not set』 key, you can complete the setting by simply progressing the items according to the guide.