5.3.2. Job program changing and position recording
5.3.2. Job program changing and position recording
(1)Looking at Figure 5.1 Palletizing configuration example, the user can know that the package pickup and place down heights are limited to 400 mm. The relevant information is defined in 0200.JOB and change the variable value of V![121] to 400 by using the virtual teaching pendant or the text edit function (Figure 5.14).

Figure 5.14 0200.JOB V![121] value changing
(2)Change the above information. Then, save the 0200.JOB file in a folder by using the save function as shown in Figure 5.15.

Figure 5.15 How to change information through a virtual teaching pendant and reflect it in a file
(3)Change the 0400.JOB file to record the home position and the package position. The pose variables that shall be changed include P6001, P6501, and P7001, meaning the home position, pickup position, and slip sheet pickup position, respectively.
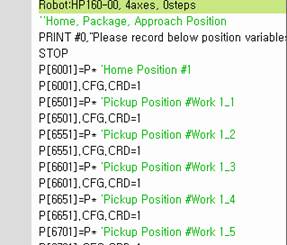
Figure 5.160400.JOB file configuration
(4)First, to record the home position, press the Motor On button using the virtual teaching pendant and move the robot to a proper position while in the manual mode. For the sake of convenience in teaching, carry out teaching using an orthogonal coordinate (Figure 5.17).
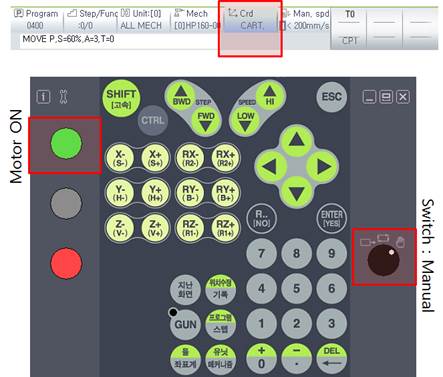
Figure 5.17 Motor on, mode switch changing, and coordinate changed position
(5)Move the robot to a desired position and change the robot’s position from P* to the current position by using variable → pose → pose constant as shown in Figure 5.18.
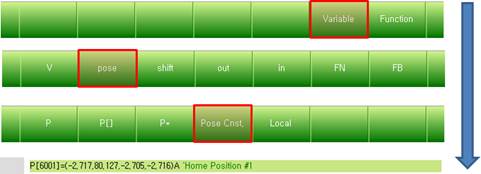
Figure 5.18 Position recording by using pose constant
(6)The remaining 3 poses (P6501, P7001) shall be recorded using the same method shown above. For your information, in this example, the following postures are recorded and used.
Table 5‑2 Shapes and coordinate values of the home position, pickup position, and slip sheet pickup position used in the example
Home position | Pickup position | Slip sheet pickup position |
|
|
|
(-2.717,80.127,-2.705,-2.716)A | (23.098,44.396,-8.083,23.099)A | (-119.867,50.580,-21.423,-119.863)A |


(7)In the next step, the pallet coordinate shall be recorded to place down the package. For this, the 3 points, P1, P2 and P3 in 0600.JOB shall be recorded and used.
(8)The position for which work teaching shall be carried out is #1 position in Figure 5.7 Register number designation and teaching position check. In HRSpace3, the position is the white colored package shown in Figure 5.19.

Figure 5.19 P1 teaching point position (white colored package, 1_1_1)
(9)Carry out teaching by placing P1 on the package position correctly only by moving it on the orthogonal coordinate without rotation. Teaching shall be carried out exactly in the same manner used in Figure 5.18 Position recording by using pose constant.
(10)After P1 teaching is carried out, P2 can be recorded by moving slightly in the X+ direction on the orthogonal coordinate. P2 can be recorded by moving slightly in the Y+ direction.
(*)In the example, the same positions as shown in Table 5.3 Examples of P1, P2 and P3 position recording
Table 5‑3 Examples of P1, P2 and P3 position recording
P1 | P2 | P3 |
|
|
|
(-41.373,22.353,43.769,-41.3689)A | (-38.439,6.302,74.822,-38.434)A | (-29.795,28.510,31.846,-29.790)A |


When the 0001.JOB program is operated automatically from the virtual teaching pendant after teaching is completed, there will be a section in which stopping would occur when the Stop command is carried out in the middle of processing. You can delete or ignore it and continue to press the Start button to progress. Then, you can check whether palletizing has been executed normally.