5.3.1. Layout arrangement and job program loading
5.3.1. Layout arrangement and job program loading
(1) After going through [5.2 Pattern creating progressing in stages], it is possible to check that files are crated as shown below in (Table 5-1). To carry out simulation, the contents of 0200.JOB, 0400.JOB, and 0601.JOB shall be changed.
Table 5‑1 Roles of created job programs and whether to be changed by the user
File name | Role | Whether to be changed by the user |
0001.JOB | Main program |
|
0050.JOB | Vacuum on |
|
0051.JOB | Vacuum off |
|
0100.JOB | Process parameter setting |
|
0200.JOB | Initialization of variables | ㅇ |
0300.JOB | Initialization of signals |
|
0400.JOB | Home position and workpiece position pose program | ㅇ |
0451.JOB | Tool control program |
|
0501.JOB | Pallet loading pattern shift variable |
|
0551.JOB | Slip sheet shift variable |
|
0601.JOB | Pallet coordinate creating program | ㅇ |
0701.JOB | Pallet parameter setting |
|
0751.JOB | Basic palletizing program |
|
0801.JOB | Slip sheet parameter setting |
|
0851.JOB | Slip sheet insertion program |
|
0999.JOB | Error handling program |
|
1001.JOB | (Simulation) test setup |
|
1002.JOB | (Simulation) test ending condition check |
|
Result.hrs | HRSpace3 Project File |
|
(2) First, when the created Result.hrs file is opened, the following screen will be shown (Figure 5.9)
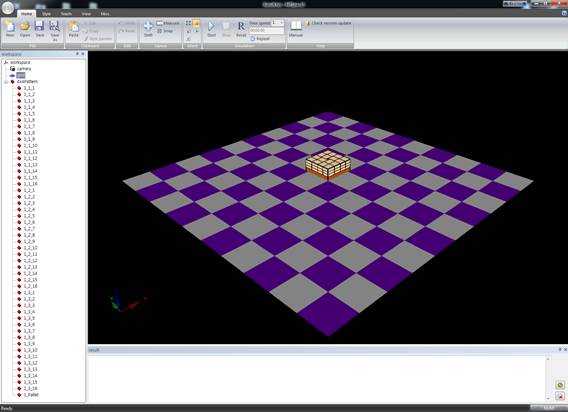
Figure 5.9 HRSpace3 project created by HRpal
(3) After adding the HP160 robot to the workspace tree by referring to Figure 5.1 Palletizing configuration example (Figure 5.10), arrange the position properly by using the home tap shift function.
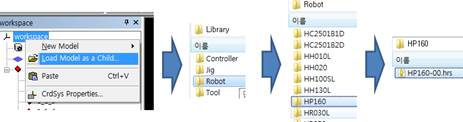
Figure 5.10 HP160 robot adding
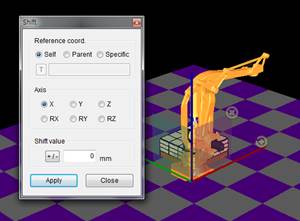
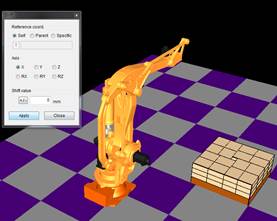
Figure 5.11 Shifting function
(4) To check surely that the robot moves the object correctly, copy the 1_1_1 model in the 4 x 4 pattern and paste it into the tap under the robot tree. After that, change the position (relative) values in the model property section to 0, 0, 0, changing the shape into one that looks like the robot holding the object (Figure 5.12).
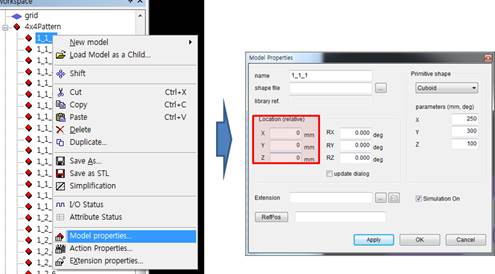
Figure 5.12 Changing the shape into one that looks like the robot holding an object
(5) When the arrangement is completed, save the file. Then, you can see that a robot folder is created in the folder.
(6) Move all the job programs created by HRpal to the robot folder. Then, load the job programs on the virtual controller by using the update function in the VRC folder of the virtual controller tool (Figure 5.13).
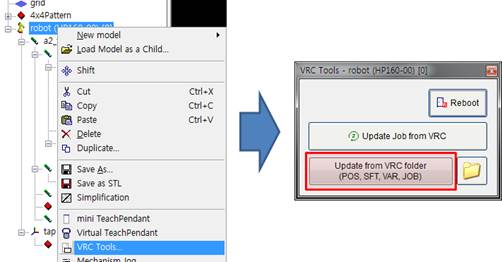
Figure 5.13 How to reflect the standard job program in the virtual controller