4.1. Embedded DeviceNet master Info and setting
4.1. Embedded DeviceNet master Info and setting
Set the network parameters, such as communication speed and the CAN port, and configure the connected slaves to use the embedded DeviceNet master function. Perform the next procedure.
(1) Execute the item. 『[F2]: System』 → 『2: Control parameter』 → 『2: Input/Output signal setting』 → 『13: Embedded DeviceNet slave info and setting.
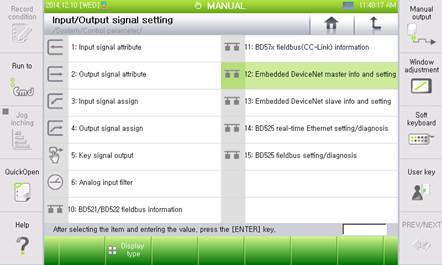
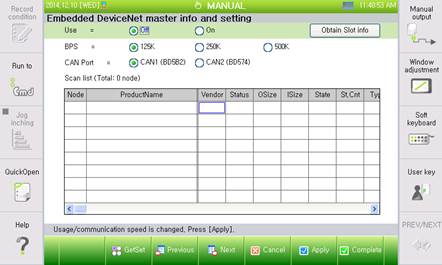
Figure 4.1 Embedded DeviceNet master information and setting menu
(2) Select the communication speed and the CAN port as well as “On” for the use, then click the “[F6]: Apply” button.
(3) Click the “[F1]: Scan node” button to search slaves that are connected to the Hi5a controller DeviceNet master.
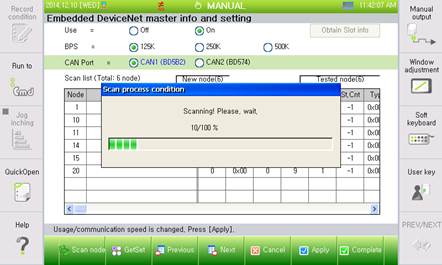
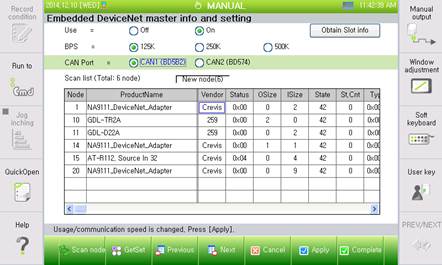
Figure 4.2 Embedded DeviceNet master node search
(4) Click the “[F6]: Apply” button to save searched slave information in the controller.
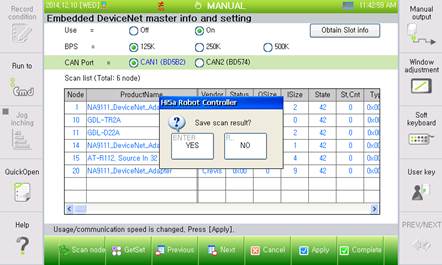
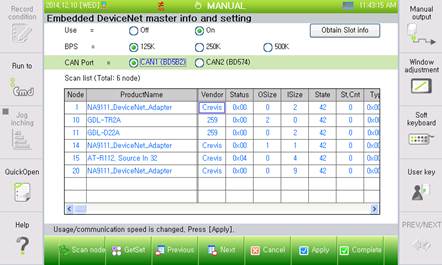
Figure 4.3 Save the embedded DeviceNet master scan result
(5) Slaves already searched, and the DeviceNet communication has been opened. The node number, product name, manufacturer, and I/O data size can be checked from the scan list information. Major information displayed on the scan list are as follows.
n Node: DeviceNet Node No. (MAC ID)
n ProductName: product name
n Vendor: manufacturer ID
n Osize: size of output data (Bytes)
n Isize: size of input data (Bytes)
n State: DeviceNet state (42: DeviceNet IO Connection normal)
n St.Cnt: number of accumulated state change
n Type: Device Type
n Code: Device Code
n Rev: product version (Revision Number)
n Serial Nr.: slave serial number (serial number)
n Ex#1~#16: extension IO information of the slave node (only some products will be supported)
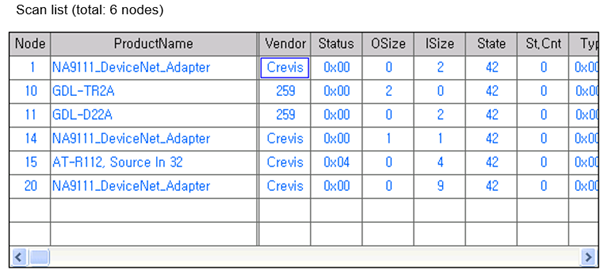
Figure 4.4 Embedded DeviceNet master scan list
(6) Click the “[F2]: GetSet” button to perform an Explicit message communication with a specific node.
Type the number in the dialog box or click [Enter] in the combo box to enter an Explicit message request information, such as MAC ID, Service, or Class, and then click the Send button.
The following Response message will be shown at the bottom when message communication is performed normally.
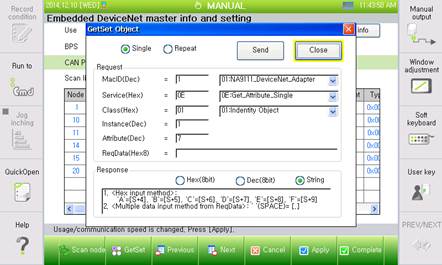
Figure 4.5 Explicit message
(7) The Embedded DeviceNet master network configuration (scan list) can be edited manually. Slaves can be added or deleted manually from the scan list, and the size of specific slave I/O data can be changed.
Edit the DeviceNet network configuration according to the next procedure.
① Click the embedded DeviceNet master information and the “Edit Node” button in the setting screen.

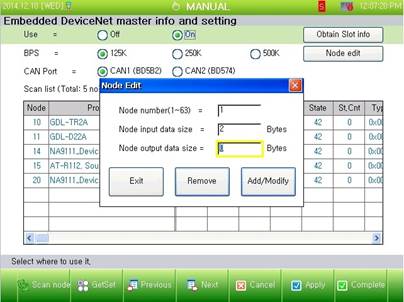
Figure 4.6 Edit Node
※ The node editing function is supported by controller SW version V40.06-00 or more.
② Enter the node number, node input data size, and node output data size in the Node Edit dialog box, and then click the “Add/Edit” button to add a node.
If the node that is already in the scan list is added, then the size of the corresponding I/O data will be changed as newly entered information.
Enter the node number, and then click the “Delete” button to delete the node.

Figure 4.7 Node editing dialog box
③ The ProductName of the manually added node will be displayed as “Unknown,” and some information of the node, such as Vendor and Type, will be initialized as 0.
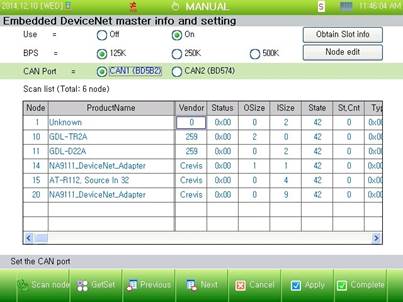
Figure 4.8 Scan list after adding the node