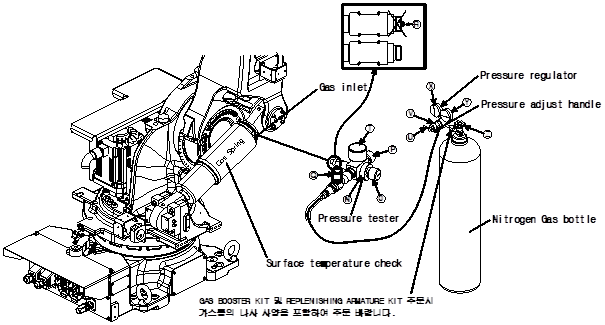
9.2.1. When the Pressure of the Nitrogen Gas Bombe Exceeds 150 bar
9.2.1. When the Pressure of the Nitrogen Gas Bombe Exceeds 150 bar
(1) Set the robot to the 90° posture, and cut off the power of the controller.
(2) Remove the plug installed to the gas inlet of the gas spring.
(3) Check that the bleed valve Pand shut-off valve [Qof the pressure tester are closed (locked clockwise.)
(4) Turn the knob Ocounterclockwise to prevent the release pin Rfrom protruding.
(5) Turn the knob Nof the pressure tester clockwise to completely connect it to the gas inlet.
(6) Check whether the handle Uand shut-off valveQ are closed.
(7) Connect the screw of the connection part of the regulator to the screw of the nitrogen gas bombe.
(Hoses should be connected as shown in the figure.)
Each country has different specifications for the screw of the nitrogen bombe, you should purchase a regulator that meets the specifications for the screw of the nitrogen bombe.
If the pressure of the nitrogen gas bombe is 150 bar or below, a booster should be fitted as well as a regulator (Condition for a nitrogen gas bombe that can perform the charging without a booster: It can keep the pressure at 150 bar or more and be capable of charging the gas spring with the pressure of 140 bar.)
(8) The gauge Xindicates the set gas pressure, and the gauge Ythe pressure of the nitrogen gas bombe.
(9) Open the knob Zof the nitrogen gas bombe, and then turn the handle U of the regulator (V)to set the set gas pressure (the set gas pressures are shown in Table 9.1 Pressure For Each Gas Spring Surface Temperature – The Set Gas Pressure.)
(10) Open the shut-off valve Qslowly and perform the charging until the pressure gauge Treaches the set pressure.
(11) When the set pressure is reached, close the shut-off value Qand then open the bleed valve Pto release the residual pressure inside the pressure tester.
Do not unscrew the bleed valve Pmore than 360°.
(12) Close the bleed valve Pto adjust the gas pressure in the gas spring.
(13) While slowly turning the knob Oclockwise, check the pressure on the pressure gauge.T
Take precautions not to allow the release pin Rto go inside excessively and damage the valve mounted on the gas spring.
(14) When the set pressure is exceeded, you should adjust the gas pressure to the desired pressure by opening and closing the bleed valve Plittle by little.
(15) Turn the knob Ocounterclockwise to retreat the release pin R.
(16) When the pressure is checked, the bleed valve Pshould be opened to completely release the residual pressure inside the pressure tester.
(17) Close the knob Zof the nitrogen gas bombe and loosen the regulator connection part to separate it from the nitrogen gas bombe.
(18) Loosen the shut-off connection part to separate it from the pressure tester.
(19) Turn the knob Nof the pressure tester counterclockwise to disconnect it from the gas spring.
(20) Check the check valve of the gas spring for oil leakage or gas leakage.
Warning! Do not look directly into the check valve hole if the gas bombe is filled with gas.
(21) Connect the G1/8 plug to the gas spring.
After charging the gas, allow about 30 minutes for the gas temperature to return to room temperature before the use.

Figure 9.2 Replenishing the Gas of the Gas Spring
The gas replenishing kit may vary in shape and name depending on the type, so please refer to the manual enclosed when you purchased it. |