9.1. Checking the Pressure of the Gas Spring
9.1. Checking the Pressure of the Gas Spring
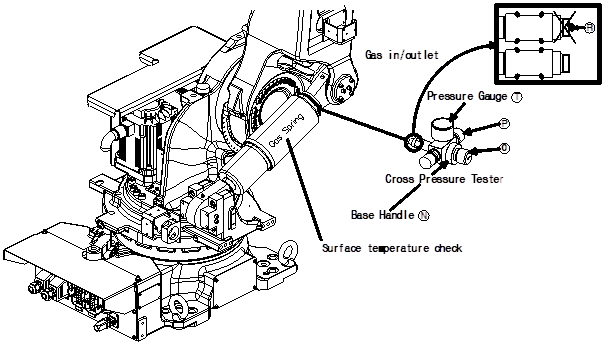
(1) Set the robot to the 90° posture, and cut off the power of the controller.
(2) Remove the plug installed to the gas inlet of the gas spring.
(3) Check whether the handle of the bleed valve P is closed (clockwise.)
(4) Check whether the gas release pin of the part marked as R is protruding. If it is protruding, turn the knob Ocounterclockwise to prevent the pin from protruding.
(5) Set the release pin R of the pressure tester (= armature) to the center of the gas inlet, and then turn the knob Nclockwise to completely connect it.
(6) Turn the knob Oclockwise and then stop turning it if the pointer of the pressure gauge T moves.
(To avoid making the release pin R go inside excessively and damage the valve inside the gas spring, do not turn the knob Oexcessively.)
The gas pressure in accordance with the surface temperature of the gas spring is shown in the table below.
(7) Check the pressure and then turn the knob Ocounterclockwise to retreat it. After that, turn the bleed valve Pcounterclockwise to discharge the residual gas inside the pressure tester.
(8) Turn the knob N of the pressure tester counterclockwise to separate it. After that, install the plug back.

Figure 9.1 Checking the Pressure of the Gas Spring
Table 9-1Pressure for Each Gas Spring Surface Temperature – The Set Gas Pressure
Temperature (℃) | 0 | 5 | 10 | 15 | 20 | 25 | 30 | 35 | 40 | 45 |
Pressure (bar) | 126 | 128 | 130 | 133 | 135 | 137 | 140 | 142 | 144 | 147 |
Each time the gas pressure is measured, the pressure is reduced by about 0.5 bar. The cross pressure tester (pressure tester = armature) may have different names and handle positions depending on the type. |