9.2.1. When the nitrogen gas bottle pressure exceeds 150 bar
9.2.1. When the nitrogen gas bottle pressure exceeds 150 bar
(1) Set the H axis of the robot at the 90 ° posture, and cut off the power to the controller
(2) Remove the plug installed in the gas inlet of the spring.
(3) Make sure that the bleed value P and shutoff value Q of the charging armature are closed (clockwise lock)
(4) Turn the knob Ocounterclockwise to prevent the release pin R from being protruding.
(5) Turn the knob N of the pressure tester (= armature) clockwise to connect it to the gas inlet completely.
(6) Check whether the valve U is closed.
(7) Connect the regulator connection part screw to the nitrogen gas bottle screw.
If the gas bottle pressure is 150 bar or below, the booster should be mounted, in addition to the regulator (conditions for the nitrogen gas bottle that can be used to fill the gas without a booster: The pressure of the gas bottle should be 150 or above and the bottle should have the capacity to fill the gas spring with the gas with a pressure of 140 bar).
(8) The gauge X indicates the target gas pressure and the gauge Y indicates the gas bottle pressure.
(9) Open the knob Z of the nitrogen gas bottle and turn the handle U of the regulator (V) to set the target gas pressure (the target gas pressure is designated in the “Table 9-1 Table of the pressure for each surface temperature of the gas spring”).
(10) Fill the gas up to the target pressure by opening the shutoff value Qslowly.
(11) If the target pressure is reached, close the shutoff valve Q and open the bleed value P to release the residual pressure inside the pressure tester (armature).
Do not loosen the bleed value P by turning it 360˚ or more.
(12) Close the bleed valve P to adjust the gas pressure of the gas spring.
(13) Check the pressure of the pressure gauge T by turning the knob Oclockwise slowly.
Take precautions not to let the release pin R to go inwards excessively, causing damage to the valve mounted to the gas spring.
(14) If the gas pressure is too high, adjust the gas pressure to the desired level by opening and closing the bleed valve P slightly.
(15) Bring the release pin R back to its original position by turning the knob O counterclockwise.
(16) When the pressure is checked, check whether the shutoff value Q is closed, and then open the bleed valve P to completely release the residual pressure inside the pressure tester (= armature).
(17) Lock the knob Z of the nitrogen gas bottle and loosen the regulator connection part to disconnect it from the gas bottle.
(18) Loosen the shutoff connection part to disconnect it from the pressure tester (armature).
(19) Turn the knob N of the pressure tester (= armature) counterclockwise to disconnect it from the gas spring.
(20) Check the check valve of the gas spring for oil or gas leaking.
Warning! Do not look directly into the check valve hole if the gas bottle is filled with gas.
(21) Fasten the G1/8 plug to the gas spring.
Once the gas is filled, please use it after waiting for about 30 minutes for the temperature to return to the level of the room temperature.
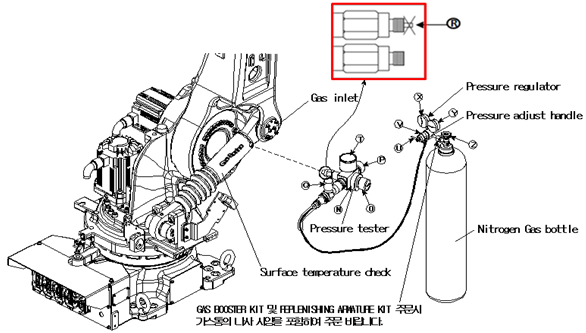
Figure 9.2 Replenishingthe gas spring with the gas
| Depending on the type, the gas replenishing kit may have a different name and its handle position may vary. Please refer to the manual enclosed when purchasing the kit. When it is necessary to replenish or fill the gas by using the booster, please refer to the manual enclosed when purchasing the kit. |
