9.1. Checking the gas spring pressure
9.1. Checking the gas spring pressure
(1) Set the H axis of the robot at the 90 ° posture, and cut off the power to the controller.
(2) Remove the plug installed in the gas inlet of the spring.
(3) Check if the handle P is locked (Clockwise lock).
(4) Check if the gas release pin R is protruding. If it is protruding, turn the handle Ocounterclockwise so that the pin does not protrude.
(5) Turn the base handle N of the pressure tester clockwise to connect it to the gas inlet completely.
(6) Slowly turn the O handle clockwise until the pressure gauge reading indicates the pressure range (do not turn the O handle excessively. Otherwise, the gas release pin R will go inwards excessively, damaging the value inside the gas spring.
The gas pressure according to the surface temperature of the gas spring is as shown in the table below.
(7) After the pressure is checked, turn the handleO counterclockwise to retract it, and then turn the handle P counterclockwise to release the residual gas inside the tester.
(8) Turn the base handle N of the pressure tester counterclockwise to disconnect it and mount the plug again.
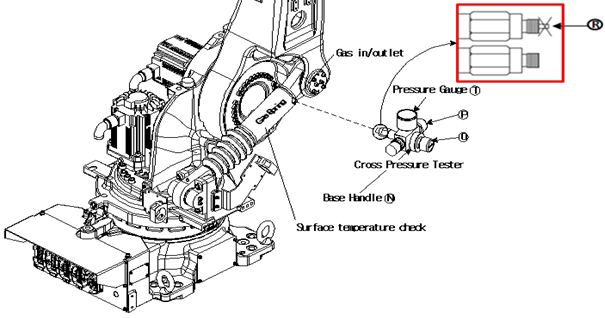
Figure 9.1 Checking the gas spring pressure
Table 9‑1 Table of the pressure for each surface temperature of the gas spring]
Temperature (℃) | 0 | 5 | 10 | 15 | 20 | 25 | 30 | 35 | 40 | 45 |
Pressure (bar) | 126 | 128 | 130 | 133 | 135 | 137 | 140 | 142 | 144 | 147 |
| Upon each gas pressure measurement, the pressure will drop approximately 0.5 bar. Depending on its type, the cross pressure tester may have a different name and its handle position may be different. Please refer to the manual enclosed together when purchasing the tester. |
