6.4.3. Replacing Axis-S Reducer [HA006E]
6.4.3. Replacing Axis-S Reducer [HA006E]
(1) Set the controller to teaching mode and set the robot to standby [ON] condition. If the robot is not in standby [ON] condition, check whether the arm is sufficiently fixated to avoid it from dropping. And then proceed to (4).
(2) The posture of the robot shall be as shown in [Figure 6.13] to prevent the arm from dropping.
(3) Turn the main power [OFF] with the controller power [OFF].
(4) Upon disconnecting the motor wire, remove the motor bolts to detach the motor from the robot body.
(5) With reference to [Figure 6.14], remove the bolt that fixes the adapter to the lower frame.
(6) Remove the part above the adapter slowly using a crane.
(7) With reference to [Figure 6.14], remove the bolt on the outlet side of the reducer to detach the adapter.
(The oil seal is assembled to the adapter.)
(8) Remove the ring (AS568-156) and the bolt on the inlet side of the reducer to detach the reducer.
(9) Replace the O-ring (AS569-159) for the new reducer before assembling the reducer. Clean and deoil the bolt of the reducer and tighten it using a torque wrench to the specified torque (torque, 15.6 Nm). Bolts need to be tightened in a diagonal sequence.
(10) Replace the O-ring (AS568-156) for the adapter before assembling the adapter. Clean and deoil the bolt on the adapter and tighten using a torque wrench to the specified torque (torque, 73.5 Nm).
Bolts need to be tightened in a diagonal sequence.
(11) Assemble the part above the adapter with the adapter slowly using a crane, which had been removed in Step (6).
(12) With reference to [6.4.2], assemble the motor and connect the motor wire.
(13) Fill up with the specified grease.
(14) Confirm that there is no error in robot's motion.
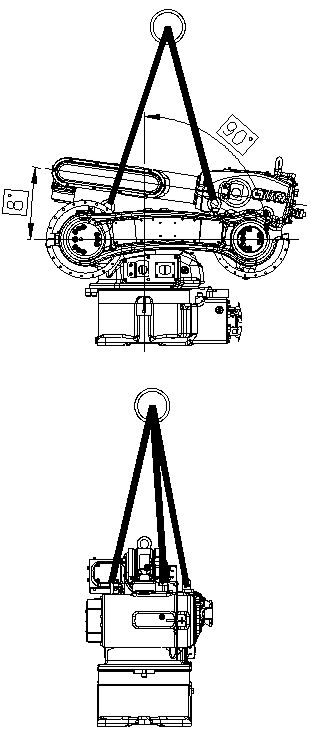
Figure 6.9 Robot position when replacing the S axis reducer [HA006E]

Figure 6.10 Axis-S Reducer Disassembly Diagram [HA006E]