6.1.1. Weaving condition
6.1.1. Weaving condition
While the cursor is placed on the WEAVON WEA#= command, if the [QuickOpen] key is pressed, the weaving condition editing screen will be displayed as shown below.
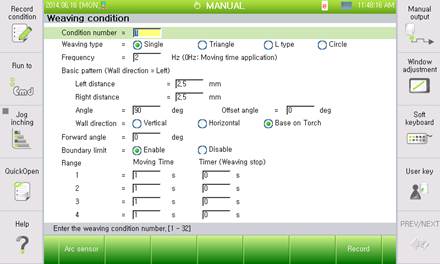
Figure 6.1 Weaving condition dialog box
The content per each item of weaving condition is as follows.
(1) Condition number: [ 1] ( Range :1 ~ 32 )
This is the number of the condition where the weaving operation setting is saved. By entering numbers or by using the [SHIFT] + [↑], [↓] keys, users can edit the relevant condition number by moving to the previous or the next condition number of the current number.
(2) Weaving type: <Single, Triangle, L type, Circle>
Designate the weaving operation type. (Refer to 6.1.2 Weaving Form)
(3) Frequency: [ 2] Hz ( Range : 0.0 ~ 10.0 )
Set the weaving frequency. The range of frequency is 0.0 ~ 10.0Hz. In case the frequency is set to ‘0’, the moving time will be applied. (Refer to 6.1.3 Frequency)
(4) Basic pattern
Set the weaving operation pattern. (Refer to 6.1.4 Basic pattern)
Left distance: [2.5] (Range: 1.0 ~ 25.0mm)
Right distance: [2.5] (Range 1.0 ~ 25.0mm)
Angle: [90] (Range: 0.1 ~ 180.0°)
Wall direction: <Vertical, Horizontal, Base on Torch>
Offset angle: Designates the angle of inclination in the left and right directions from the torch position when using the reference of the torch posture
(5) Forward angle : [0] (Range: -90.0 ~ 90.0°)
It displays the weaving angle direction to the processing direction. In case this is set to 0°, proceeding direction and weaving direction will be at right angles to each other.
(6) Boundary limit: <Enable, Disable>
Set whether to limit weaving trace by boundary of welding start section and end section. In case this function is set to valid, weaving trace will be limited to the welding section.
(7) Robot operation when weaving is stopped: <Move, Stop>
If the timer is set in the weaving pattern, the weaving operation stops at the left and right ends of the weave. This menu sets whether the robot operation will continue to move or stop in this situation.
(8) Moving time: [ 1] (Range: 0.01 ~ 10.0 sec), Timer: [ 0] (Range: 0.00 ~ 2.00)
In case the weaving frequency is set to ‘0’, weaving will be executed in the moving time. Set the moving time per each section and the weaving stop time between sections. (Refer to 6.1.7 Moving Time, 6.1.8 Timer)
When “Weaving frequency” is set, only the “Timer (Weaving Stop)” item can be configured.
The robot will perform the weaving operation for the time excluding the time set in “Timer (Weaving Stop)” from the total time for the set frequency, and the weaving operation will stop during the weaving stop time. The “Robot operation when weaving is stopped” setting will apply whether the robot moves while weaving is stopped.
(9) Weaving drive axis: <Robot, Additional Axis>, additional axis no.: [1]
It sets whether the part to perform the weaving operation is the robot or an additional axis. If an additional axis is selected, the robot will move as recorded, while only the additional axis will move as much as the set distance and frequency to perform the weaving.
When an additional axis is selected, the additional axis designated in the “Additional axis no.” item will operate to perform the weaving.