4.2. Fillet welding that uses touch sensing and arc sensing
4.2. Fillet welding that uses touch sensing and arc sensing
In general, the arc sensing function is used together with the touch sensing function. The touch sensing function enables you to find the exact welding start and end positions, and the arc sensing function allows you to find the correct direction by moving after the welding starts.
The first example is the most basic fillet welding.
The work sequence is as shown below:
1) Setting the weaving conditions, arc sensing conditions, and welding conditions
2) Searching the welding start position using touch sensing
3) Searching the welding end position using touch sensing after moving near the end position
4) Performing the work using the weaving commands and arc commands at the welding start position.
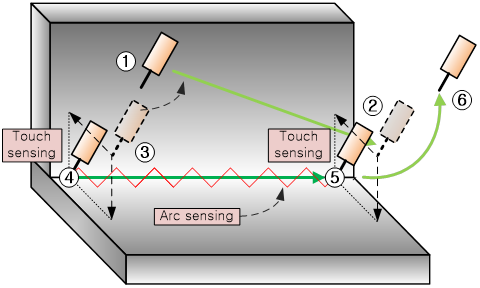
Figure4.1 Fillet touch sending and arc sensing
l The example program is as follows:
~~~~~~~Arc sensing program : 0001.JOB~~~~~~~~~~~~~~~
' Arc sensing program
S1 MOVE P,S=60%,A=3,T=1 ' 1: Operation start point
S2 MOVE L,S=30%,A=3,T=1 ' 2: End point touch sensing position
TOUCHSEN TSC#=1,-X,-Z,0,P10,V1! ' 3: Save the end point touch sensing position at P10
S3 MOVE L,S=30%,A=3,T=1 ' 4: Start point touch sensing position
TOUCHSEN TSC#=1,-X,-Z,0,P1,V1! ' 5: Save the start point touch sensing position at P1
S4 MOVE L,P1,S=20%,A=3,T=1 ' 6: Move to the welding start point
WEAVON WEV#=1 ' 7: Start the weaving and arc sensing
ARCON ASF#=1 ' 8: Start the welding
S5 MOVE L,P10,S=60cm/min,A=3,T=1 ' 9: Move to the welding end point
ARCOF ASF# '10: End the welding
WEAVOF '11: End the weaving and arc sensing
S6 MOVE P,S=60%,A=3,T=1 '12: Operation end point
END
~~~~~~~~~~~~~~~~~~~~~~~~~~~~~~~~~~~~~~~~~~~~~~~~~~