6.3. Manual Output
6.3. Manual Output
With this function, you can set the relay value of Hi5 controller remotely via Ethernet. (It doesn’t support Hi4a controller or RS-232C.) In order to activate this function, the project file (*.hpp) have to be open, and be ONLINE state.
Click the manual output button on toolbar, as figure 6.16.

Figure 6.16 Click manual output button
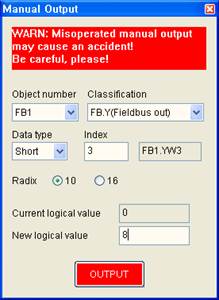
Figure 6.17 Manual output dialog box
Input object number, classification, data type, index, then the relay name is displayed on the right side of index.
If you select radix, you can check the current logical value of the relay. Input new logical value you want, and click OUTPUT button, then the relay value is set remotely.
Table 6‑3 Manual output dialogue box
Item | Description |
Object No. | If the relay type is Y, select the FN object number (1~64); if the relay type is FB.Y, select the FB object number (1, 3, 5). Object numbers are not used in the case of other relay types (they are inactivated). |
Type | Select the relay number among Y, DO, K, T, C, M, S, etc. |
Data type | Select one of the types of Bit (1bit), Char (1byte), Short (2byte), and Long (4byte). |
Index | Input the index number of the relay. |
Antilogarithm | Select whether to convert the current and new logic values into the decimal or hexadecimal number. |
Current logic value | Display the current relay value. (It is a logic value, not a physical value. That is, in the case of the output, it is the value before the negative logic was applied.) |
New logic value | Input the new applicable value when clicking the output button. |