2.4. Project Management
2.4. Project Management
Let’s try configuring a project in HRLadder.
(1) Execute HRLadder program.
(2) Select 『File (F) – New File (N)』 from the Menu. As shown in Figure 2.8, a window to select between the “HRLadder project” (Extension of .HLPRJ) and “Ladder” (Extension of .LAD). The project file manages several ladder files including hierarchical list and relay description etc.

Figure 2.8 New File Dialog Box
(3) Select “HR Ladder Project” and click on the OK button. Workspace window will appear as shown in Figure 2.9.

Figure 2.9 Empty Workspace window
(4) Select 『File (F) – Project Save (S)』 and save the project in an appropriate name. (In this example, the project is saved in the name of “R720.hlprj”.)
(5) Now select 『File (F) – New File (N)』from the menu again and select the “Ladder” item this time and click on the OK button. When the ladder edit window appears, select 『File (F) – Save (S)』 to save the ladder file in an appropriate name.
In the same method, let’s try to create and save some more ladder files.
(In this example, the names of “S00_Main.lad” and “S03_Init.lad” are used.)
(6) Right click on “PC Ladders” in the Workspace and the following popup menu will appear as shown in Figure 2.10.

Figure 2.10 Add file to Workspace
(7) When you select “Add Files to Folder…”, the following window will appear. Select the file to add as shown in Figure 2.11 and click on the 『Open(O)』 button. By clicking with the Ctrl or Shift key pressed, you can select multiple files.
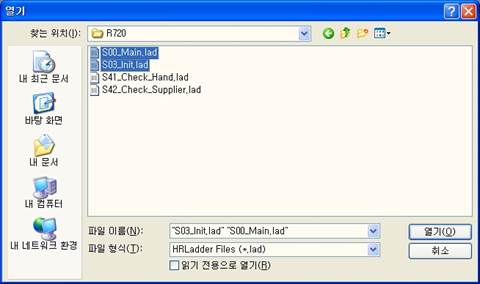
Figure 2.11 Select File to Add
(8) The file names will appear under the “PC Ladders”. After right clicking as shown in Figure 2.12, select the “New Folder…”.

Figure 2.12 Create New Folder
(9) When the New Folder dialog box is displayed as shown in [Figure 2.13], enter anappropriate folder name. (In this example, the name of “Check_IO” is used.

Figure 2.13 Dialog Box to Input Name of New Folder
(10) Let’s try to create two more ladder files in the method described above.
(In this example, the name of “S41_Check_Hand.lad” and “S41_Check_Supplier.lad” are used.)
(11) Let’s try to create a new ladder file based on the method described before the new folder name. Final result would look like [Figure 2.15].

Figure 2.14 Ladder File Added to Hierarchy
(12) You can select “Rename” from the popup menu or press the [F2] key to rename the folder.

Figure 2.15 Rename folder
(13) The folder and ladder file will continuously have sub nodes while maintaining the hierarchy. One thing to note is that creating a folder in the task window does not necessarily create a folder in actual Windows OS. This folder is just a data structure that the project file of HRLadder manages within the file.