9.1. Check the Pressure of Gas Spring
9.1. Check the Pressure of Gas Spring
(1) Set the posture of H-axis of the robot at 90° and cut the power of the controller.
(2) Remove the plug that is installed at the gas inlet of the spring.
(3) Check if the handle Bleed Valve ⓟ is locked. (Turn clockwise to lock).
(4) Check if the gas release pin, displayed as ⓡ, sticks out. If it sticks out, turn the handle ⓞ in a counterclockwise direction, careful not to stick out the pin.
(5) Match the release pin ⓡ of the pressure tester (=armature) with the center of the gas inlet, and then turn the knob ⓝ clockwise to complete the connection.
(6) Turn the knob ⓞclockwise and stop turning when the indicator of the pressure gauge ⓣ moves.
(Do not turn the knob ⓞexcessively because it will insert the release pin ⓡ too far and cause damage to the check valve inside the spring.)
The pressure of the injected gas will be as per the following depending on the temperature at the surface of the gas spring cylinder.
(7) After the pressure is checked, turn the knob ⓞ counterclockwise to retract it, and then turn the bleed valve ⓟcounterclockwise to release residual gas in the pressure tester.
(8) Turn the base handle ⓝ of the pressure tester in a counterclockwise direction to separate it, and install the plug again.
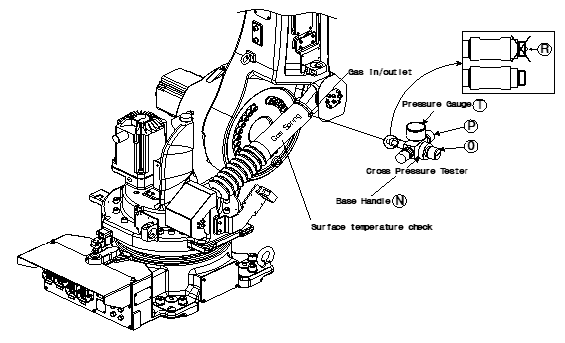
Figure 9.1 Check the Pressure of the Gas Spring
Table 9‑1 Pressure Table by Gas Spring Surface Temperature- Set gas pressure
Temperature (℃) | 0 | 5 | 10 | 15 | 20 | 25 | 30 | 35 | 40 | 45 |
Pressure (bar) | 126 | 128 | 130 | 133 | 135 | 137 | 140 | 142 | 144 | 147 |
| Each time the gas pressure is measured, the pressure will decrease by about 0.5 bars. The name and the position of the cross pressure tester (Pressure tester = armature) may vary depending on the type. |
