2.4.3. Communication port of the robot of Hyundai Robotics
2.4.3. Communication port of the robot of Hyundai Robotics
The Hi5a controller of Hyundai Robotics only supports UDP Ethernet communication. For the Ethernet connection to the robot controller, it is required to connect the connector at one end of the Ethernet cable to the robot controller Ethernet socket and the other one to the Ethernet socket of the Ethernet switch.
After the Ethernet cable is connected, the Ethernet IP address and subnet mask should be set for the robot to perform Ethernet communication. The Ethernet address of the controller itself will be basically set, as shown below, after the robot is installed. Refer to Figure 2-6 for the Ethernet environment setting screen of the TP. To return to the basic setting, make the settings using the numbers, as shown in Table 2-2. It is recommended that you should use, if possible, the basic settings without changing the basic values of the IP address, subnet mask, and the gateway.
Table 2-2 Hi5a controller Ethernet setting
Controller IP address | 192.168.1.254 (Basic address) |
Controller subnet mask | 255.255.255.0 |
Controller gateway | 192.168.1.1 |
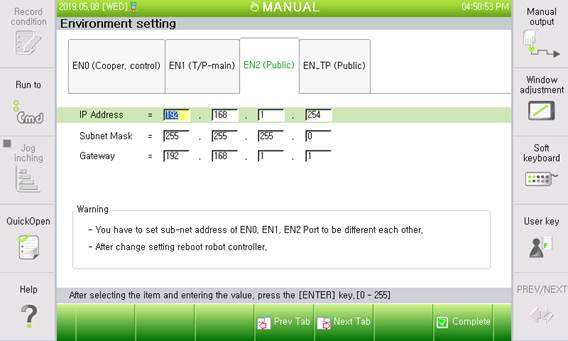
Figure 2-5 TP Ethernet setting screen
The Ethernet IP address of the controller itself can be freely changed between [192.168.1.0] and [192.168.1.255] by the user. However, the IP address you want to change should not overlap with the address used by EN_TP (Universal) [192.168.1.25] (Basic), UDP2TCP converter [192.168.1.11], and the Pick-it equipment [192.168.1.12]. For more information, the [192.168.XXX.XXX] IP address band is a special address band used as an internal private IP address.
For the robot to carry out works by interoperating with the Pick-it equipment, the Ethernet IP address and port number of the UDP2TCP converter should be inputted into the Ethernet statement that is used to set the receiving part in a way that the Ethernet variable in the JOB file should go through the UDP2TCP converter without going directly to the Pick-it equipment. In this way, the robot controller will send the variable to the UPD2TCP converter, and the converter will receive the variable and send them to the Pick-it equipment. Refer to Table 2-3 for the Ethernet IP address and port number of the receiving part (UDP2TCP converter) to be set in the JOB file.
The address and port number of the UDP2TCP converter are fixed, and their settings cannot be changed by the user. The settings of the Ethernet IP address and port number between the robot controller and UDP2TCP converter are described with more detail in the examples of JOB files in Chapter 4.
Table 2-3 Ethernet IP address and port number of UDP2TCP converter
UDP2TCP IP address | 192.168.1.11 |
UDP2TCP UDP port number (RPORT) | 5001 |
Controller UDP port number (LPORT) | 5001 |