3.1. Dialogue box for teach pendant sharing
3.1. Dialogue box for teach pendant sharing
When the teach pendant sharing function is turned on, a small teach pendant icon and a number together will be indicated on the left side of the title bar on the top of the screen.

The number is the ID number of the controller that is connected to the teach pendant currently. In order to connect it to other controller, it is required to click [SHIFT]+[5] button to open up a dialogue box for sharing the teach pendant.
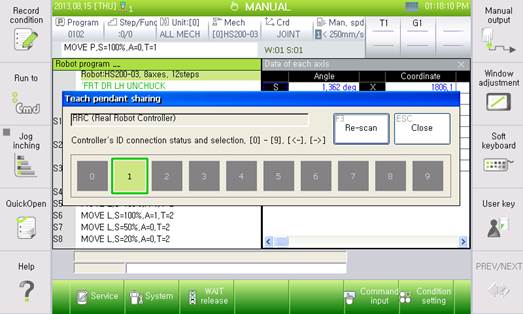
The content of the dialogue box is similar to that of the teach pendant sharing function setting screen. The rectangle in light green show the ID of the controller recognized on the network. The outline in dark green is the connection cursor that represents the currently connected controller. It is possible to shift the connection cursor to the desired ID by clicking one of the [0] ~ [9] keys on the keypad. It is also possible to move the cursor in the left or right direction by using the left and right arrows. Shifting can be performed also by touching the desired ID directly on the screen.

When the connection cursor moves to other ID number, the teach pendant displays the relevant ID on the title bar and shows the screen of the connected controller. Clicking the [ESC] key will close the sharing dialogue window.
The operation of the emergency key and robot enable switch can be carried out for all controllers, while the operation of other functions of the teach pendant can be performed only through the currently connected controller.