2.2. Function setting and ID assignment
2.2. Function setting and ID assignment
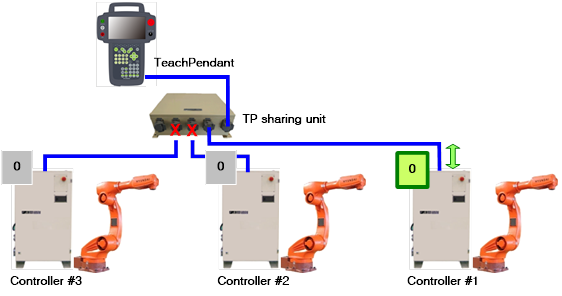
As described in 2.1, only the #1 controller should have the connection with the Ethernet connector.
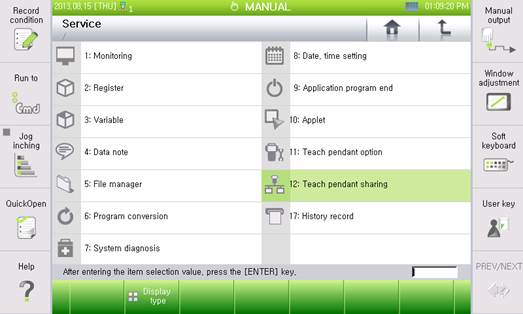
Select 『[F1]: Service』 - 『12: Teach pendant sharing』.
Select RRC (Real Robot Controller)
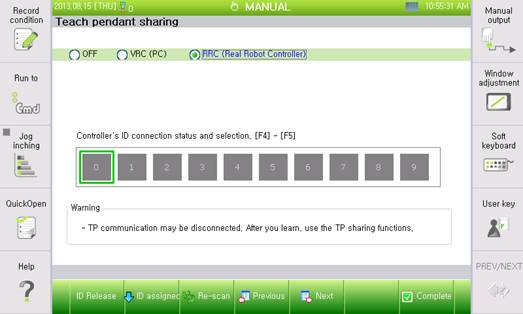
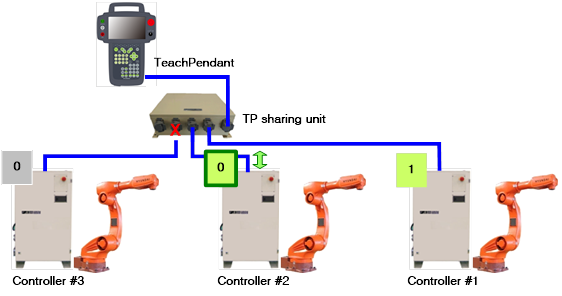
When it comes to the ID connection status of individual controllers, the turned on light green rectangle signifies that the corresponding controller is recognized, while the turned off gray rectangle means that its corresponding controller is not recognized. Individual unique IDs need to be assigned when connecting individual controllers one by one.
Currently, as shown in the below figure, all the controllers have ID 0 as the initial value. Clicking the 『[F3]: Re-scan』 key will turn on ID 0. It is that the ID 0 of the #1 controller is recognized by the teach pendant because only the #1 controller have the Ethernet connector connected.
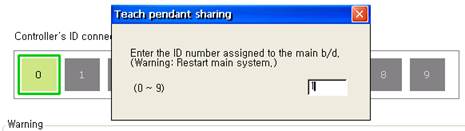
Let’s try to assign ID 1 for the #1 controller. Clicking the『[F2]: ID assigned』 key will bring up a dialogue window to enter an ID number. Then, click 1 and then [Enter], ID 1 will be set for the controller #1. As the #1 controller will be rebooted automatically, users need to wait for a while.
After the rebooting, clicking 『[F3]: Re-scan』 key will help check that ID 1 exists on the network.

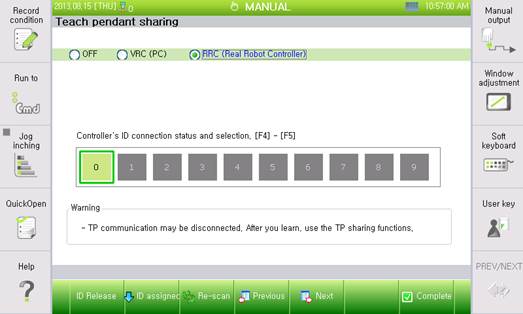
Next, let’s try to assign ID 2 for the #2 controller. It is required to have the Ethernet connection additionally for the #2 controller. Clicking 『[F3]: Re-scan』 key will help recognize ID 0 as the initial value of the #2 controller. The current status is as shown below.

Place the cursor on ‘0’ and click the 『[F2]: ID assigned』 key and then enter 2 into the dialogue window and click [Enter]. Then, ID 2 will be set for the #2 controller.

Wait for a while to allow the #2 controller to be rebooted automatically.
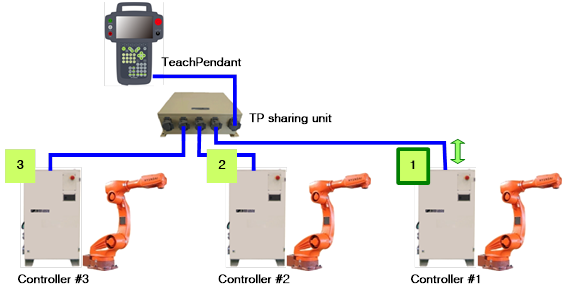
Set individual unique IDs for all the connected controllers by applying the same procedure. When the setting is completed, it is required to connect all the connectors through the Ethernet, and then click the 『[F3]: Re-scan』. All the set IDs are turned on, the preparatory work is completed.

Lastly, it is required to click the 『[F7]: Complete』 key to save that RRC is selected, the setting process will be completed.