3.5. Comment and Relay Description Table
3.5. Comment and Relay Description Table
You can add a comment to each relay and open the relay description table to edit the entered relay comment in table format.
(1) When you double click on the top part of the relay you want to edit, the edit box to enter the comment will be displayed as shown in [Figure 3.19].

Figure 3.19 Edit Box for Comment Input
(2) When you enter the comment and press the Enter key, the comment will be displayed as shown in [Figure 3.20].

Figure 3.20 Instruction with a comment
(3) For the box type instruction, you can enter the comment by double clicking the top of the box as shown in [Figure 3.21].

Figure 3.21 Comment Input of Box Type Instruction
(4) You can add a comment to the Rung as well. After double clicking the Rung number as shown in [Figure 3.22] enter the comment in the edit box and hit Enter when done.


Figure 3.22 Adding Comment to Rung
(5) Comment information is saved and managed within the project file and not in the ladder file. That is, the relay comment entered applies to all the ladder files opened on the screen. If you would like to save the comment to the ladder file and not the project file, open the option dialog box by with 『Tool (T) – Option (O)』 and check the “Load/Store inst. comments in LAD file” item as shown in [Figure 3.23]. When the comment is saved in the ladder file, it will also be downloaded from/uploaded to Controller when the ladder file is downloaded/uploaded.

Figure 3.23 Tool –Option Dialog Box
(6) Select 『View (V) – Relay Description Table (L)』 from the main menu or click on the  button to display the relay description table. The relay description table will be displayed as shown in [Figure 3.24]. On the top, name of relay type will exist as a tab to include “X, Y, DI, DO” etc. When you click on each tab, the relay comment of the selected type will be displayed and when you click on the ALL tab, all relay comments will be displayed.
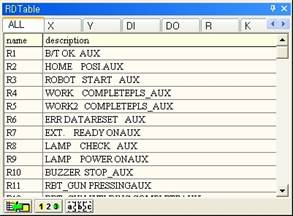
Figure 3.24 Relay Description Table
(7) When you click on the specific row, you can edit the relay name or comment of the row as shown in [Figure 3.25].
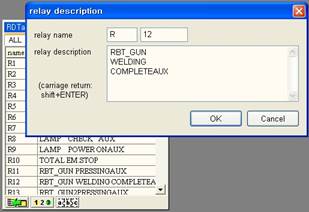
Figure 3.25 Edit Relay
(8) There are 3 buttons at the bottom of the relay description table. The role of each button is described in [Table 3-3].
Table 3‑3 Button Function of Relay Description Table
Importing from Ladder Document
| If the comment information is saved in the ladder file, and you would like to import this information to the project file, first open the ladder file and click on this button.
Dialog box displaying the list of the currently opened ladder files will be displayed as shown above. Select the file you want and click on the OK button. The comment information of the selected ladder file will be copied to the project file as a batch process and displayed on the relay description table. |
Auto Increase
| For example, if you select the “X1” item from the relay description table and click on this button, every time you click on this button, the relay index will increase as “X2, X3, X4…” in the following rows to automatically enter the relay items.
|
Sort
| This sorts the relay in order and sorts in reverse order when you click once more. |


(9) The relay description table can also be saved as the text file. Select 『File (F) – Export Relay Description... (E)』 with the project window selected. Enter the file name and click on the Save button. The file is saves the relay name and description in a simple tab delimited format as shown in [Figure 3.26].
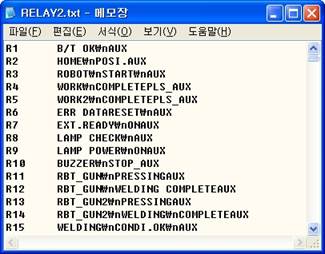
Figure 3.26 Relay Description Table Saved as Text File
(10) You can open this type of text file from Microsoft Excel as shown in [Figure 3.27].
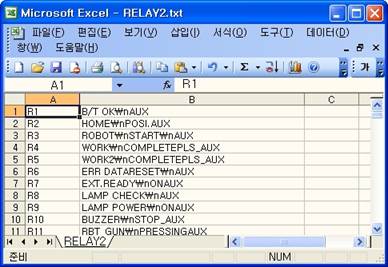
Figure 3.27 Relay Description Table Imported from Excel
(11) On the other hand, you can save relay description table prepared in Excel as the tab delimited text file and import the file to the project through『File (F) – Import Relay Description... (I)』.