5.1.2. H / V-Axis Reducer
5.1.2. H / V-Axis Reducer
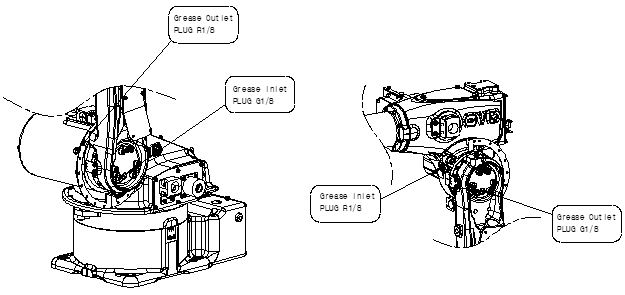
Figure 5.2 Position of Grease Inlet/Outlet on Axis-H/V [HH012A]
| Attention If grease is added without removing the outlet plug, it cause damage to the seal of reducer and grease will go inside the motor and may damage it. It is absolutely necessary to remove the plug. |

n Grease Replacement
(1) Make the H-Axis arm vertically and the V axis horizontally.
(2) Remove the grease outlet plug.
(3) Inject the grease into the grease inlet using a grease gun.
ü Grease type : VIGO GREASE RE0 ü Amount of grease 1) HH012A H axis : 426cc(384g) V axis : 266cc(240g) |
ü Grease type : EUREKA 114 No.0 ü Amount of grease 2) HH012A H axis : 426cc(358g) V axis : 266cc(224g) |
(4) The grease replacement is complete when new grease appears in the outlet port. The new grease can be distinguished from the old one by color.
(5) Move the H-Axis for a few minutes to eject the old grease and then add grease until the new grease appears in the outlet port.
(6) Clean the outlet with cloth and release over-injected grease.
① Place a vinyl bag on the grease outlet.
② Commission the Axis-H, V at ±45° for 1.5 hours at 50% speed.
③ Remove the vinyl bag.
(7) Clean the greased around the outlet and assemble the seal-taped plug into its original state.
| Caution If the specification of the currently filled grease is MOLYWHITE RE00, you must fill the VIGO GREASE RE0 grease after more than 100 hours of operation. |
n Injecting grease after replacing the reducer.
(1) Prepare a grease nipple A-PT1/4, A-PT1/8.
(2) Remove the plug G1/4, G1/8 of the grease inlet, and fasten the grease nipple A-PT1/4, A-PT1/8.
(3) Remove the plug G1/4, G1/8 of the grease outlet and an air vent set, and fasten the plug G1/4, G1/8 to the air vent set.
(4) Inject the grease into the grease inlet using a grease gun.
ü Grease type : : VIGO GREASE RE0 ü Amount of grease 1) HH012A H axis : 533cc(480g) V axis : 333cc(300g) |
ü Grease type : : EUREKA 114 No.0 ü Amount of grease 2) HH012A H axis : 533cc(448g) V axis : 333cc(280g) |
(5) The grease replacement is complete when new grease appears in the outlet port.
(6) Discharge excessively fueled grease and residual pressure. (Refer to the discharge procedure below.)
(7) Remove the grease nipple of the inlet and the plug of the air vent, and assemble the inlet plug and air vent set.
n Procedure in discharging excessively fueled grease and residual pressure after grease replacement and injection
(1) Attach a grease receiver or a hose to the grease outlet to prevent contamination from discharged grease.
(2) Operate it within a range without surrounding and interference under the following conditions.
④ Operation angle : H-Axis, 90° or more / V-Axis, 70° or more.
⑤ Operation speed : 50%
⑥ Operation time: 20 minutes or more
(3) Wipe the outlet port with a cloth and attach the plug.