4.1.1. Overview of the interface
4.1.1. Overview of the interface
Figure 4-1 shows the procedure for constructing the system using the robot and Pick-it equipment and performing the works. What should be performed in the individual procedures is as follows.
(1) Install and configure the robot, Pick-it equipment, and communication equipment. Refer to individual manuals for configuring the robot and Pick-it equipment. Refer to Chapter 2 of this manual for Ethernet communication configuration.
(2) Access the Pick-it server through the Chrome web browser and make basic settings.
(3) When it comes to the robot of Hyundai Robotics, it is required to enter the pages for user environment, control parameters, and robot parameters and make settings, such as coordinates and Ethernet communication, using a TP.
(4) Write the JOB files of the work to perform using Hyundai Robotics’ commands for Pick-it applications. The JOB files to write include the ones for calibration and bin-picking.
(5) Attach a calibration plate to the flange of the robot, and calibrate the Pick-it coordinate to the robot coordinate using the JOB file for calibration.
(6) When the Pick-it coordinate calibration is completed, let the robot pick the workpiece using the JOB file.
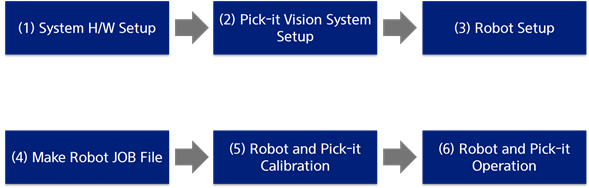
Figure 4-1 Procedures for interface between the robot and Pick-it equipment
To allow the robot to perform works, calibration should be performed first. After that, the works can be performed using the robot and Pick-it equipment. This chapter first describes how to calibrate the Pick-it coordinate to the robot coordinate by writing a JOB file that makes it possible to control the robot and give commands to the Pick-it equipment. The chapter also describes how to allow the robot to perform picking by writing a JOB file that allows commands and variable to be sent and received between the robot and Pick-it equipment and allows the robot to perform picking by receiving the pose of the workpiece from the Pick-it equipment.