6.2.1. Type of reference point
6.2.1. Type of reference point
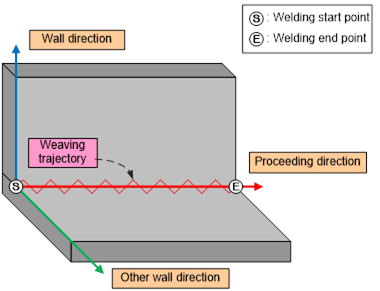
Figure 6.7 Weaving coordinate
(1) REFP 1 (Reference Point 1)
REFP 1 is a command for designating the wall direction of the weaving coordinate. When the wall direction is not designated specifically, the robot will perform the weaving work while taking the vertical direction as the wall direction. Accordingly, if the wall direction is not the vertical direction, this command should be used to designate the wall direction.
Method of use: Record a point on the wall direction surface of the workpiece as REFP 1. The wall direction surface can be determined by using the point and the welding path (linear line ⓢⓔ). When only the REFP 1 command is used, the other direction can be set by rotating them according to the angles of their basic patterns based on the proceeding direction of the decided wall direction.
(2) REFP 2 (Reference Point 2)
REFP 2 is a command for setting the weaving trajectory in either of the spaces of the surface, which decides the wall direction.
Method of use: Record a point in the space above the surface where the weaving will be performed as REFP 2. Figure 6.8 shows an example of a weaving coordinate that is set by recording REFP 2 in the space between the two base metals. When only the REFP 2 command is used, the other direction can be set by taking the Z-axis of the robot coordinate as the wall direction.
(3) REFP 3 (Reference Point 3)
REFP 3 is a command for designating the weaving proceeding direction for stationary weaving in which the robot stops while the positioner rotates.
Method of use: Record as REFP 3 a point on the linear line that shows the proceeding direction at the position where the robot stops. The robot will perform weaving in the vertical direction to the line that is created by the welding start point and REFP 3.
Example of use: After the teaching of REFP 3 is performed, the teaching for the welding start and end step positions need to be performed. The moving speed needs to be set by using time (Caution: An error will be generated without the weaving work being performed if REFP 3 is not designated)
(4) REFP 4 (Reference Point 4)
REFP 4 is a command for setting the angle between the wall direction and another direction. Figure 6.8 shows an example of the angle being set at 90 degrees. If the angle is designated by using the command, the value set through [Basic pattern] -> [Angle] will be ignored.
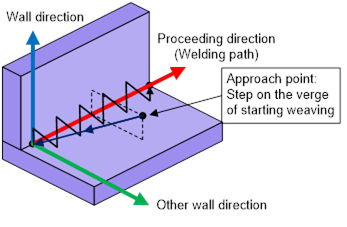

Figure 6.8 Weaving direction and reference point
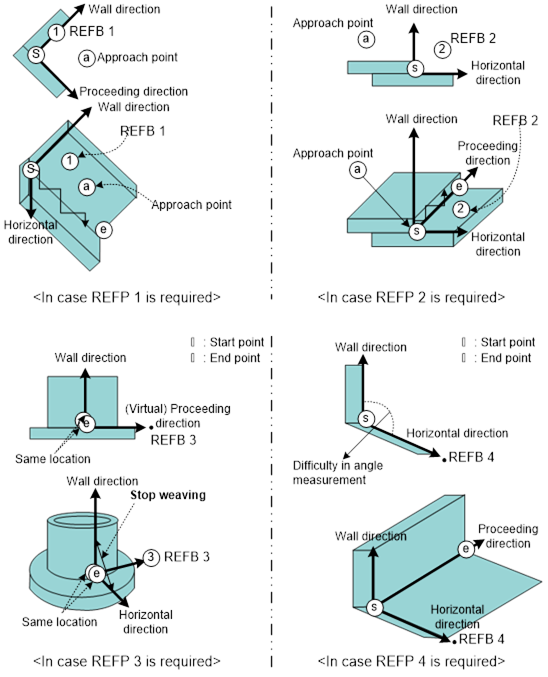
Figure 6.9 Application per each reference point type

l REFP 1: Set the distance to the welding path to at least 5mm.
l REFP 2: Set the distance to the wall direction to at least 5mm.
l REFP 3: Set the distance to the start point to at least 5mm.
l REFP 4: Designate an angle if it is difficult to measure the weaving pattern angle.