7.1. Creation of Path
7.1. Creation of Path
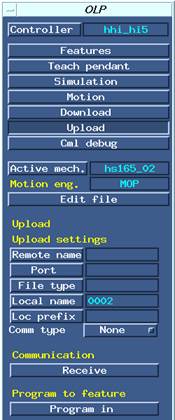
Figure 7.1 Upload menu
First, copy the work file of the Hi5 controller to be uploaded into the work cell directory of ROBCAD using HRView or USB. (Please refer to the Hi5 controller operation manual for more information on this process.)
[Figure 7.1] shows the [Upload] button of OLP being clicked. Click <Local name> first and select the work file to be called. Path and locations will be created in the work cell after you click <Program in>.
[Figure 7.2] shows a newly created path being confirmed by opening ROBCAD <Path Editor>.
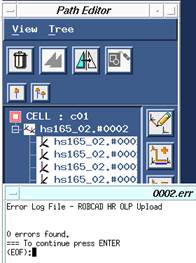
Figure 7.2 ROBCAD Path Editor
The name of the path and each location will be determined according to the following rules.
Path name | {robot instance name}.#{file name} |
Location name | {robot instance name}.#{file name}_l{step No.} |
For example, if the robot instance name is hs165_02 and the file name is 0002, the name of path will be “hs165_02.#0002” and the name of each location will be “hs165_02.#0002_l1”, “hs165_02.#0002_l2”, etc.
The upload model of Hi5 OLP package creates the step as a local location. From the example above, “hs165_02.#0002_l1” refers to a local location called “0002_l1” which falls under “hs165_02” robot component.
NOTE Local location and global location
A local location can be considered as an entity attached to a robot component. That is, if the location of the robot component to which a local location is attached is moved, the local location is also moved. On the other hand, global locations are not attached, and even if the location of a robot instance used for a teach global location is changed, the global location will not be moved.
If a global location is used, the robot position (configuration) will be changed whenever simulation or download is executed, so a difference between simulation and actual robot motion may occur. Therefore, if work is downloaded by using an actual robot controller, it might be better to execute the download after changing the global location to a local location by using the auto teach function of ROBCAD. |
NOTE Changing the name of a local path or local location
If you change the name of a local location using “rename” in <Path Editor>, an error will occur in the local path. This is considered an error of ROBCAD option. Names of local path and local locations can be changed by selecting the <Weld_locs> menu from ROBCAD/Spot, and clicking the [Rename] button in the <Locations> menu.
Enter a name of a location in the Location name field (or select a location with the mouse), input a new name in the New name field, and click [Accept] when the Rename dialog box is displayed. |