1. Basic information of arc welding
1.1. Introduction
Teach the arc welding work as the following picture.
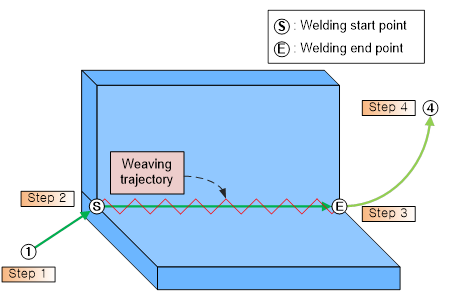
Figure 1.1 Basic arc welding teaching
(1) Turn on the power switch on the front side of the controller.
(2) Select a manual mode from [Mode] switch of teach pendant.
(3) Click [Program] on the teach pendant and enter the program number.
(4) At this stage, the teach pendant will display the following screen.
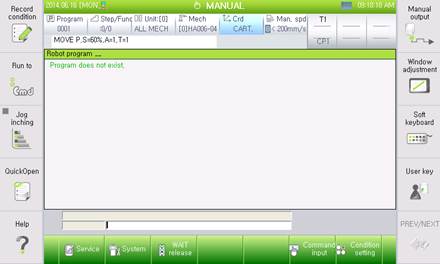
Figure 1.2 New program number selected
(5) Click [Motor On] on the teach pendant to supply power to the robot motor.
(6) Use the axis control button to move the robot torch to Step 1 position.
(7) Click [Record condition] key and select the interpolation type, speed, accuracy and the tool number that you want to use.
① Use the arrow keys to move to the target item and then set the value and press the [ENTER] key to save the setting.
② Press [Tool] key and enter the tool number you want for setting the tool number. (Select [Tool] key by pressing [SHIFT]+[Coordinate] key.)

Figure 1.3 Contents of the record condition displayed
When the [Record condition] key is pressed, the set conditions will be recorded as shown below.
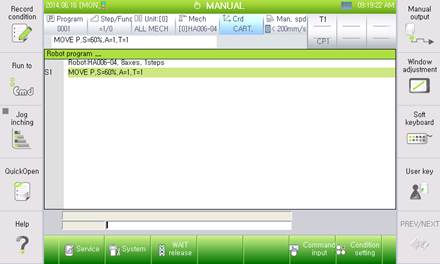
Figure 1.4 Step recording screen (1)
(8) Repeat (5) ~ (7) process for Step 2~4.
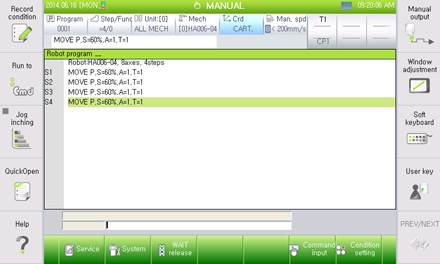
Figure 1.5 Step recording screen (2)
(9) Move the cursor to Step 2 since welding sections are between Step 2 ~ Step 3.
① Click [User key] to display the registered user key at the bottom of the screen.
② Click [WEAVON] key ([F4] by default) when using weaving. Input the pattern number and click [ENTER].
③ Click [ARCON] key in the same way. Enter the pattern number and press the [ENTER] key. (Refer to [Chapter 5. Arc welding condition editing] to learn more about how to set arc welding conditions.)
(10) Bring the cursor to Step 3 in which the arc welding ends.
① Click [User key] again to display the registered user key at the bottom of the screen and click [ARCOF] key to enter the command.
② Click [WEAVOF] key in the same way to enter WEAVOF command.
(11) Adjust the speed in Step 3 to the desired welding speed. (Ex. 12mm/s)
(12) Finally, enter the END command that will terminate the program.
Click 『[F6]: Command input』 → 『[F2]: Flow control』 → 『[F7]: END』 to enter the END command.
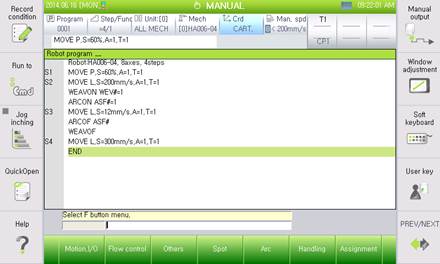
Figure 1.6 Teaching complete
1.2.Arc welding function setting